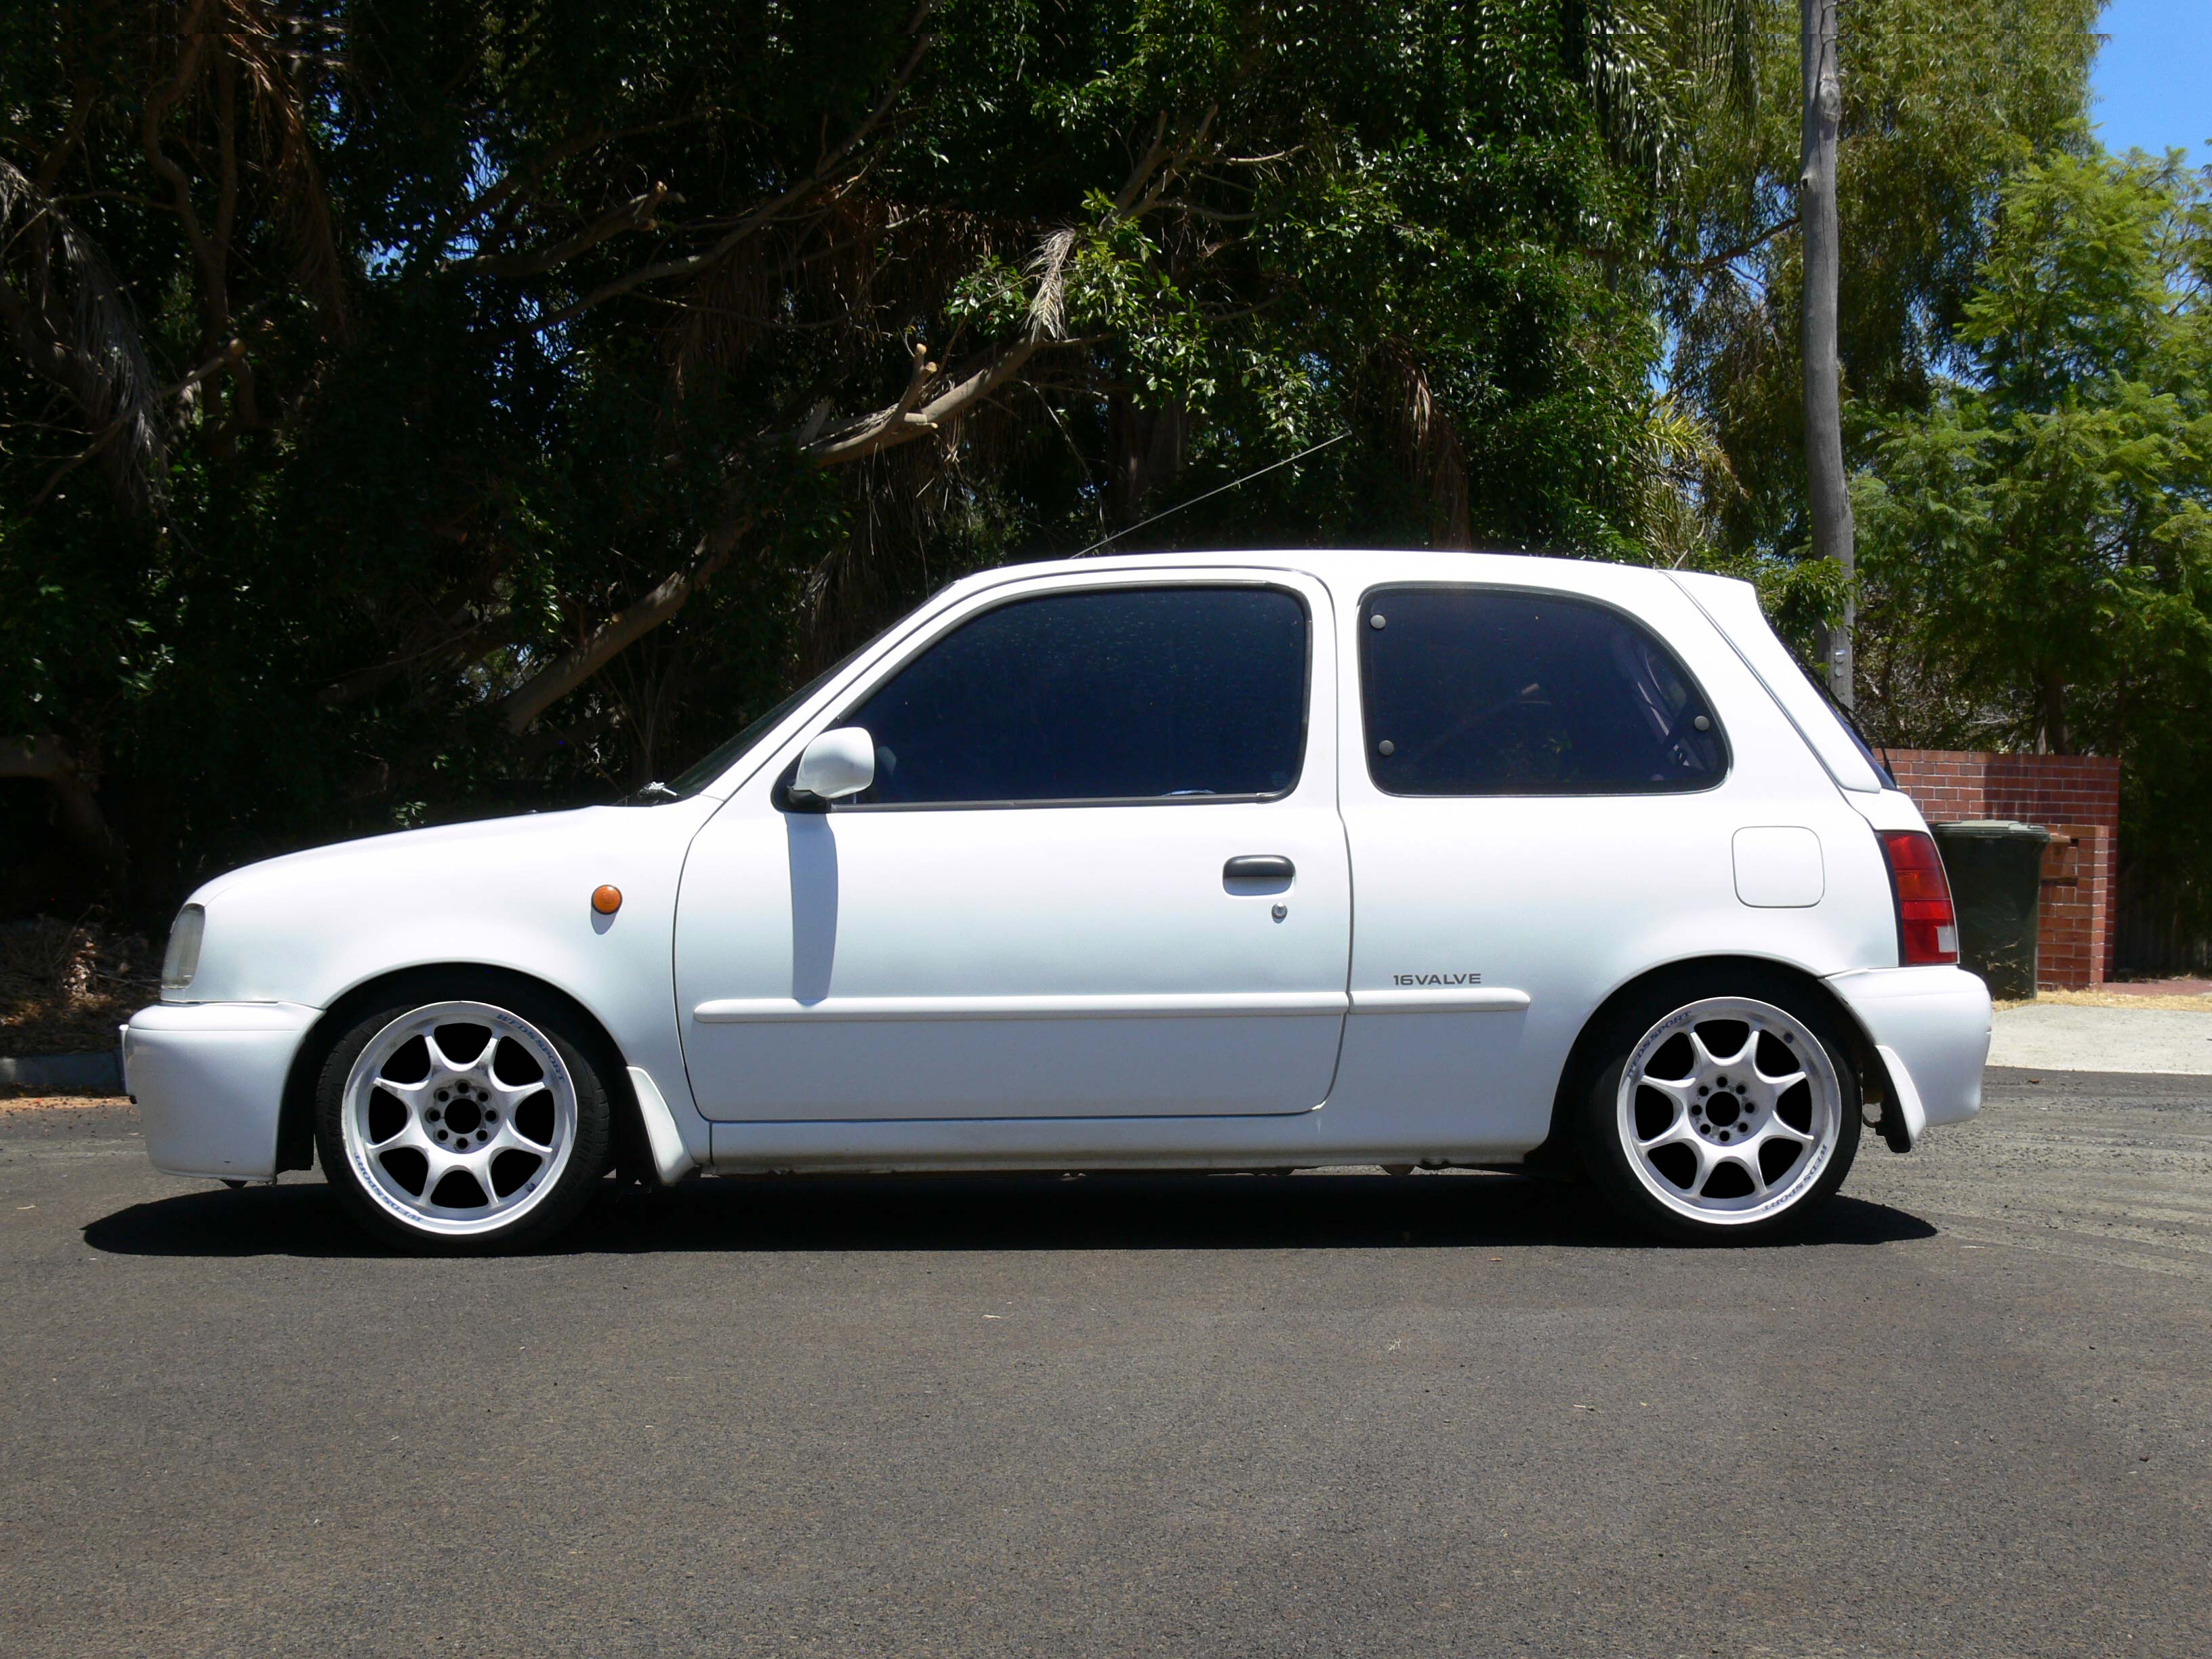
So I recently picked up some rims from Japan (via Import Monster) for our family 1995 Nissan K11 Micra. They're classic lightweight Weds Sports TC-05 in 15x6+30, they should fit very nicely under the guards of the Micra, once they've been wrapped in some Nankang NS-II tyres in 185/45R15. The condition of them isn't too good, so I'll be getting them blasted and powder coated. Of course choosing the right colour is always a hard task, so I photoshopped up a set of different colours for my wife to look over as she is the primary driver of it. She's chosen to go with either a Dark Silver/Gun Metal Grey, followed by Silver. My son and I think the gold and red looks pretty good, but he will need to wait until he takes ownership before he changes th he colour - and then he can probably just do a Plasti-dip change.
Above: K11 Micra with White (original colour) 15x6+30 Weds Sport TC-05 (Photoshopped)
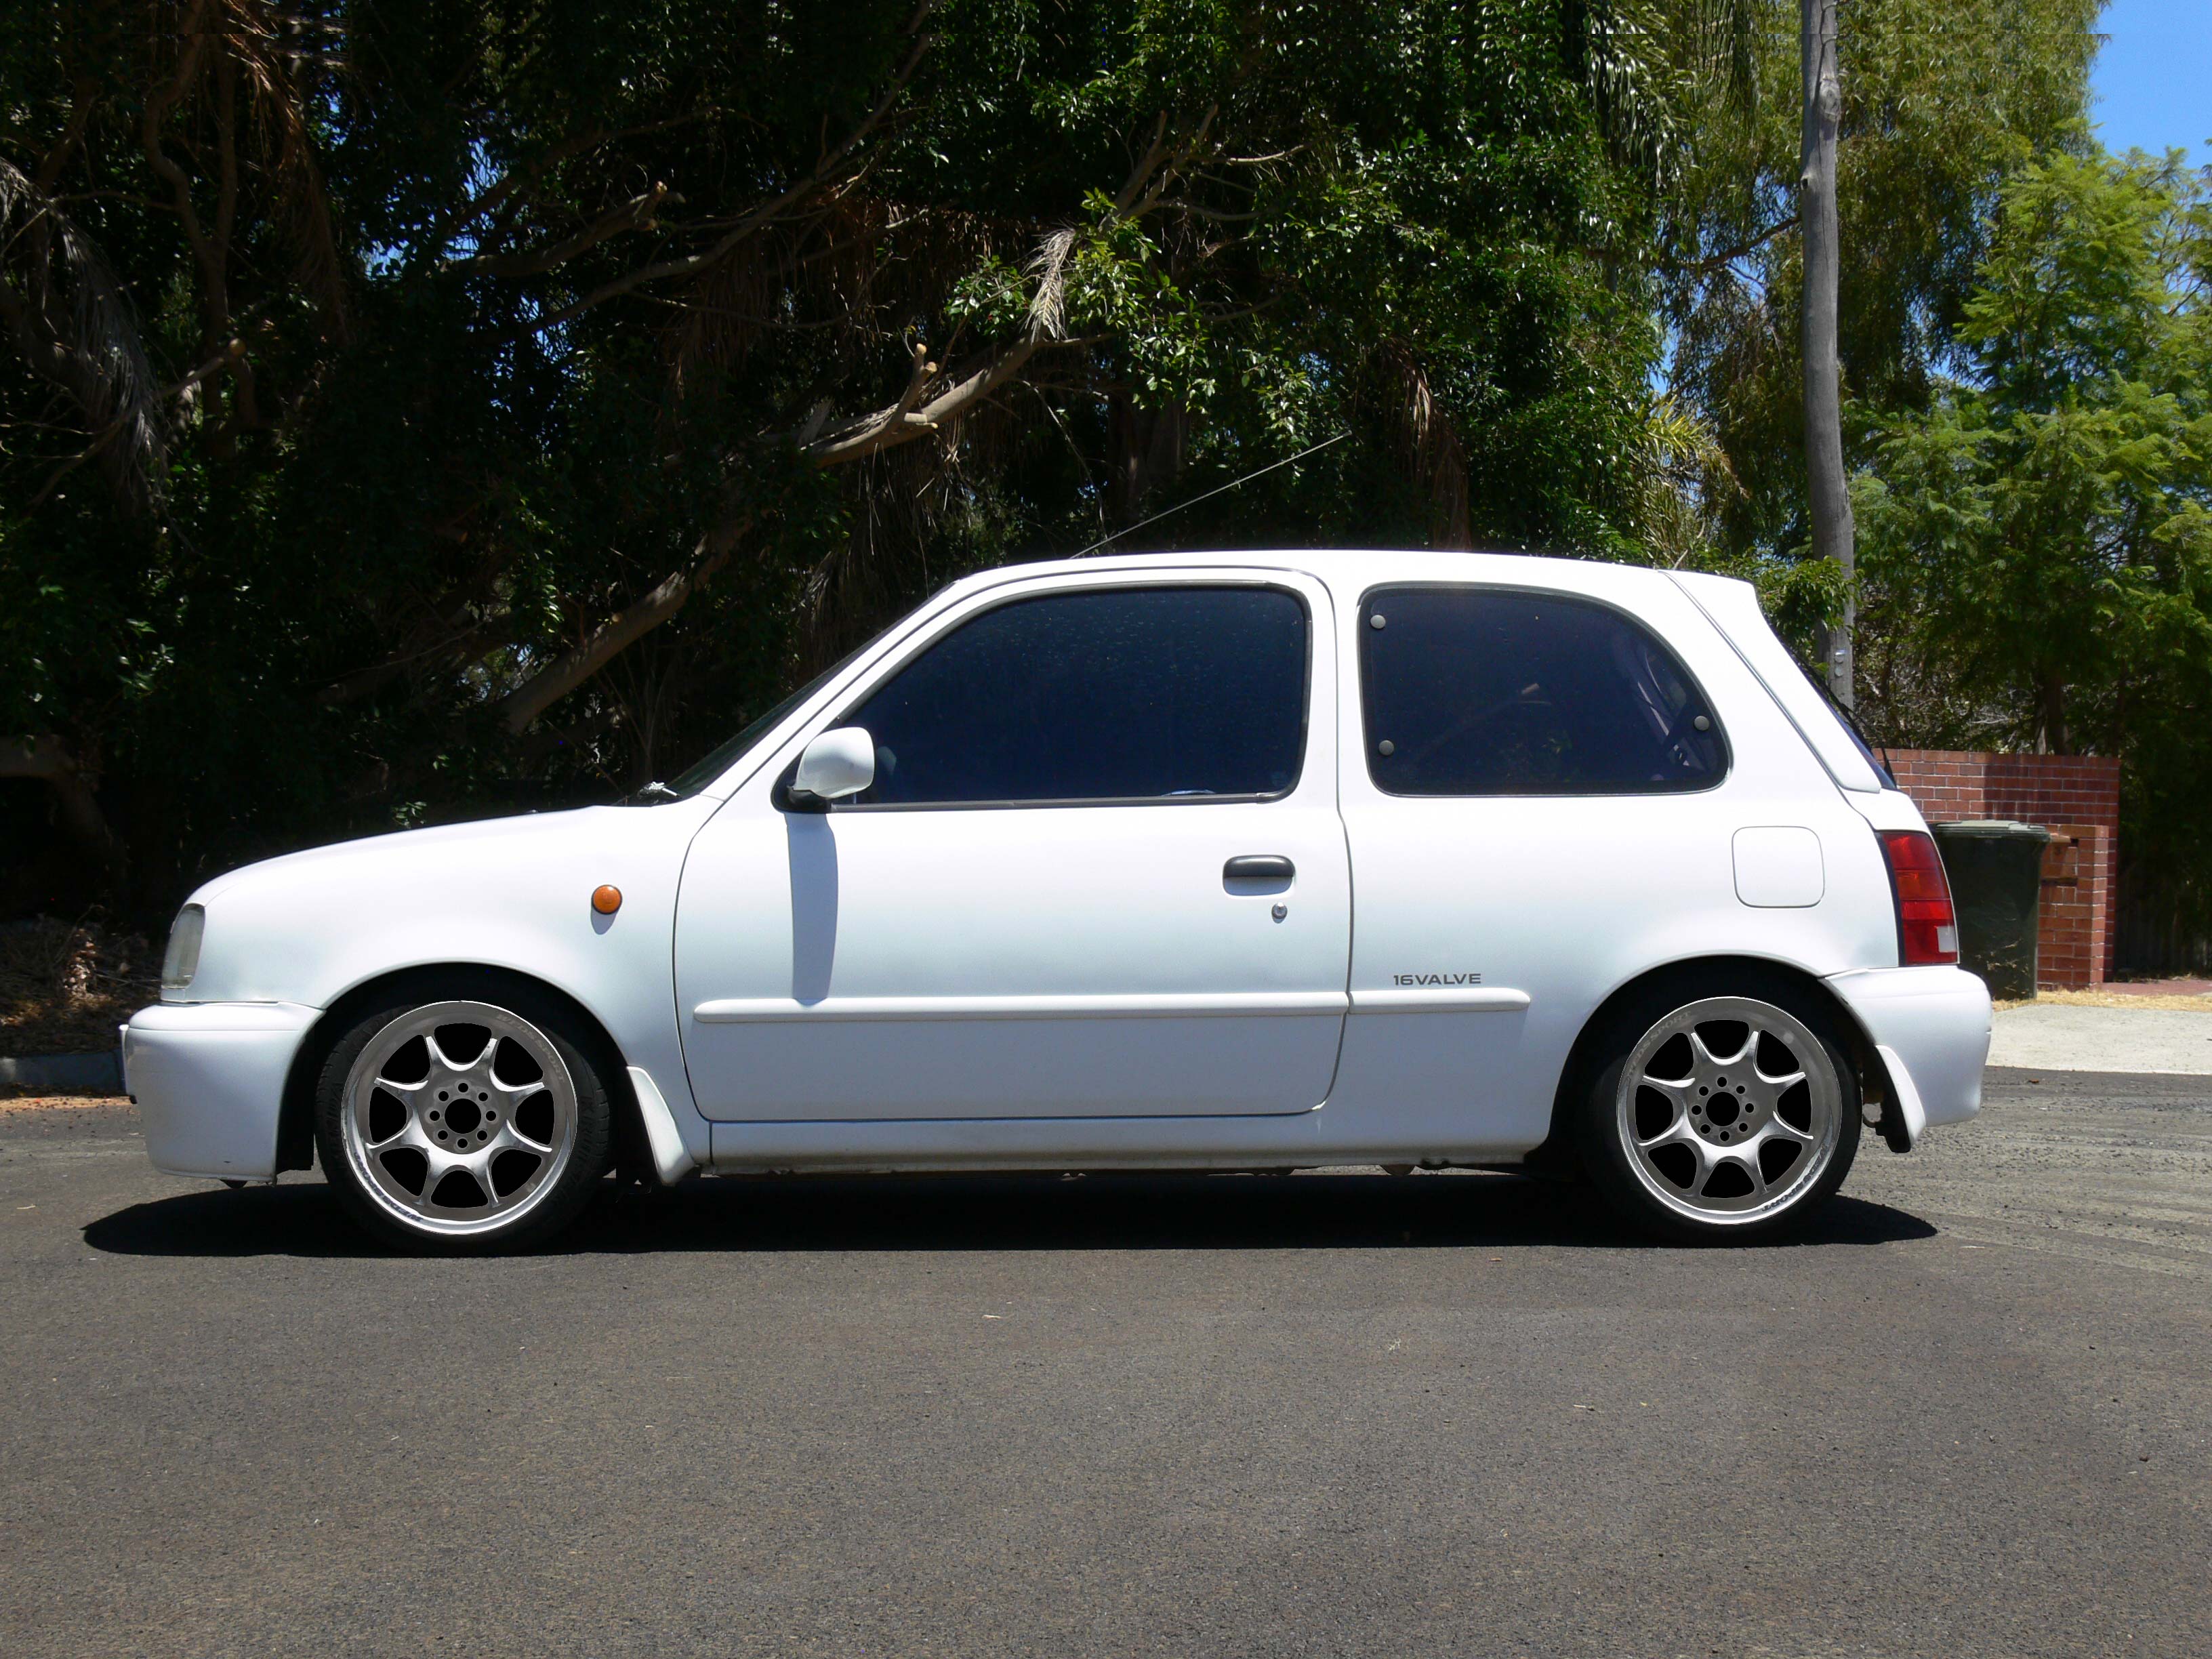
Above: K11 Micra with Silverish (photoshop trial colour) 15x6+30 Weds Sport TC-05 (Photoshopped)
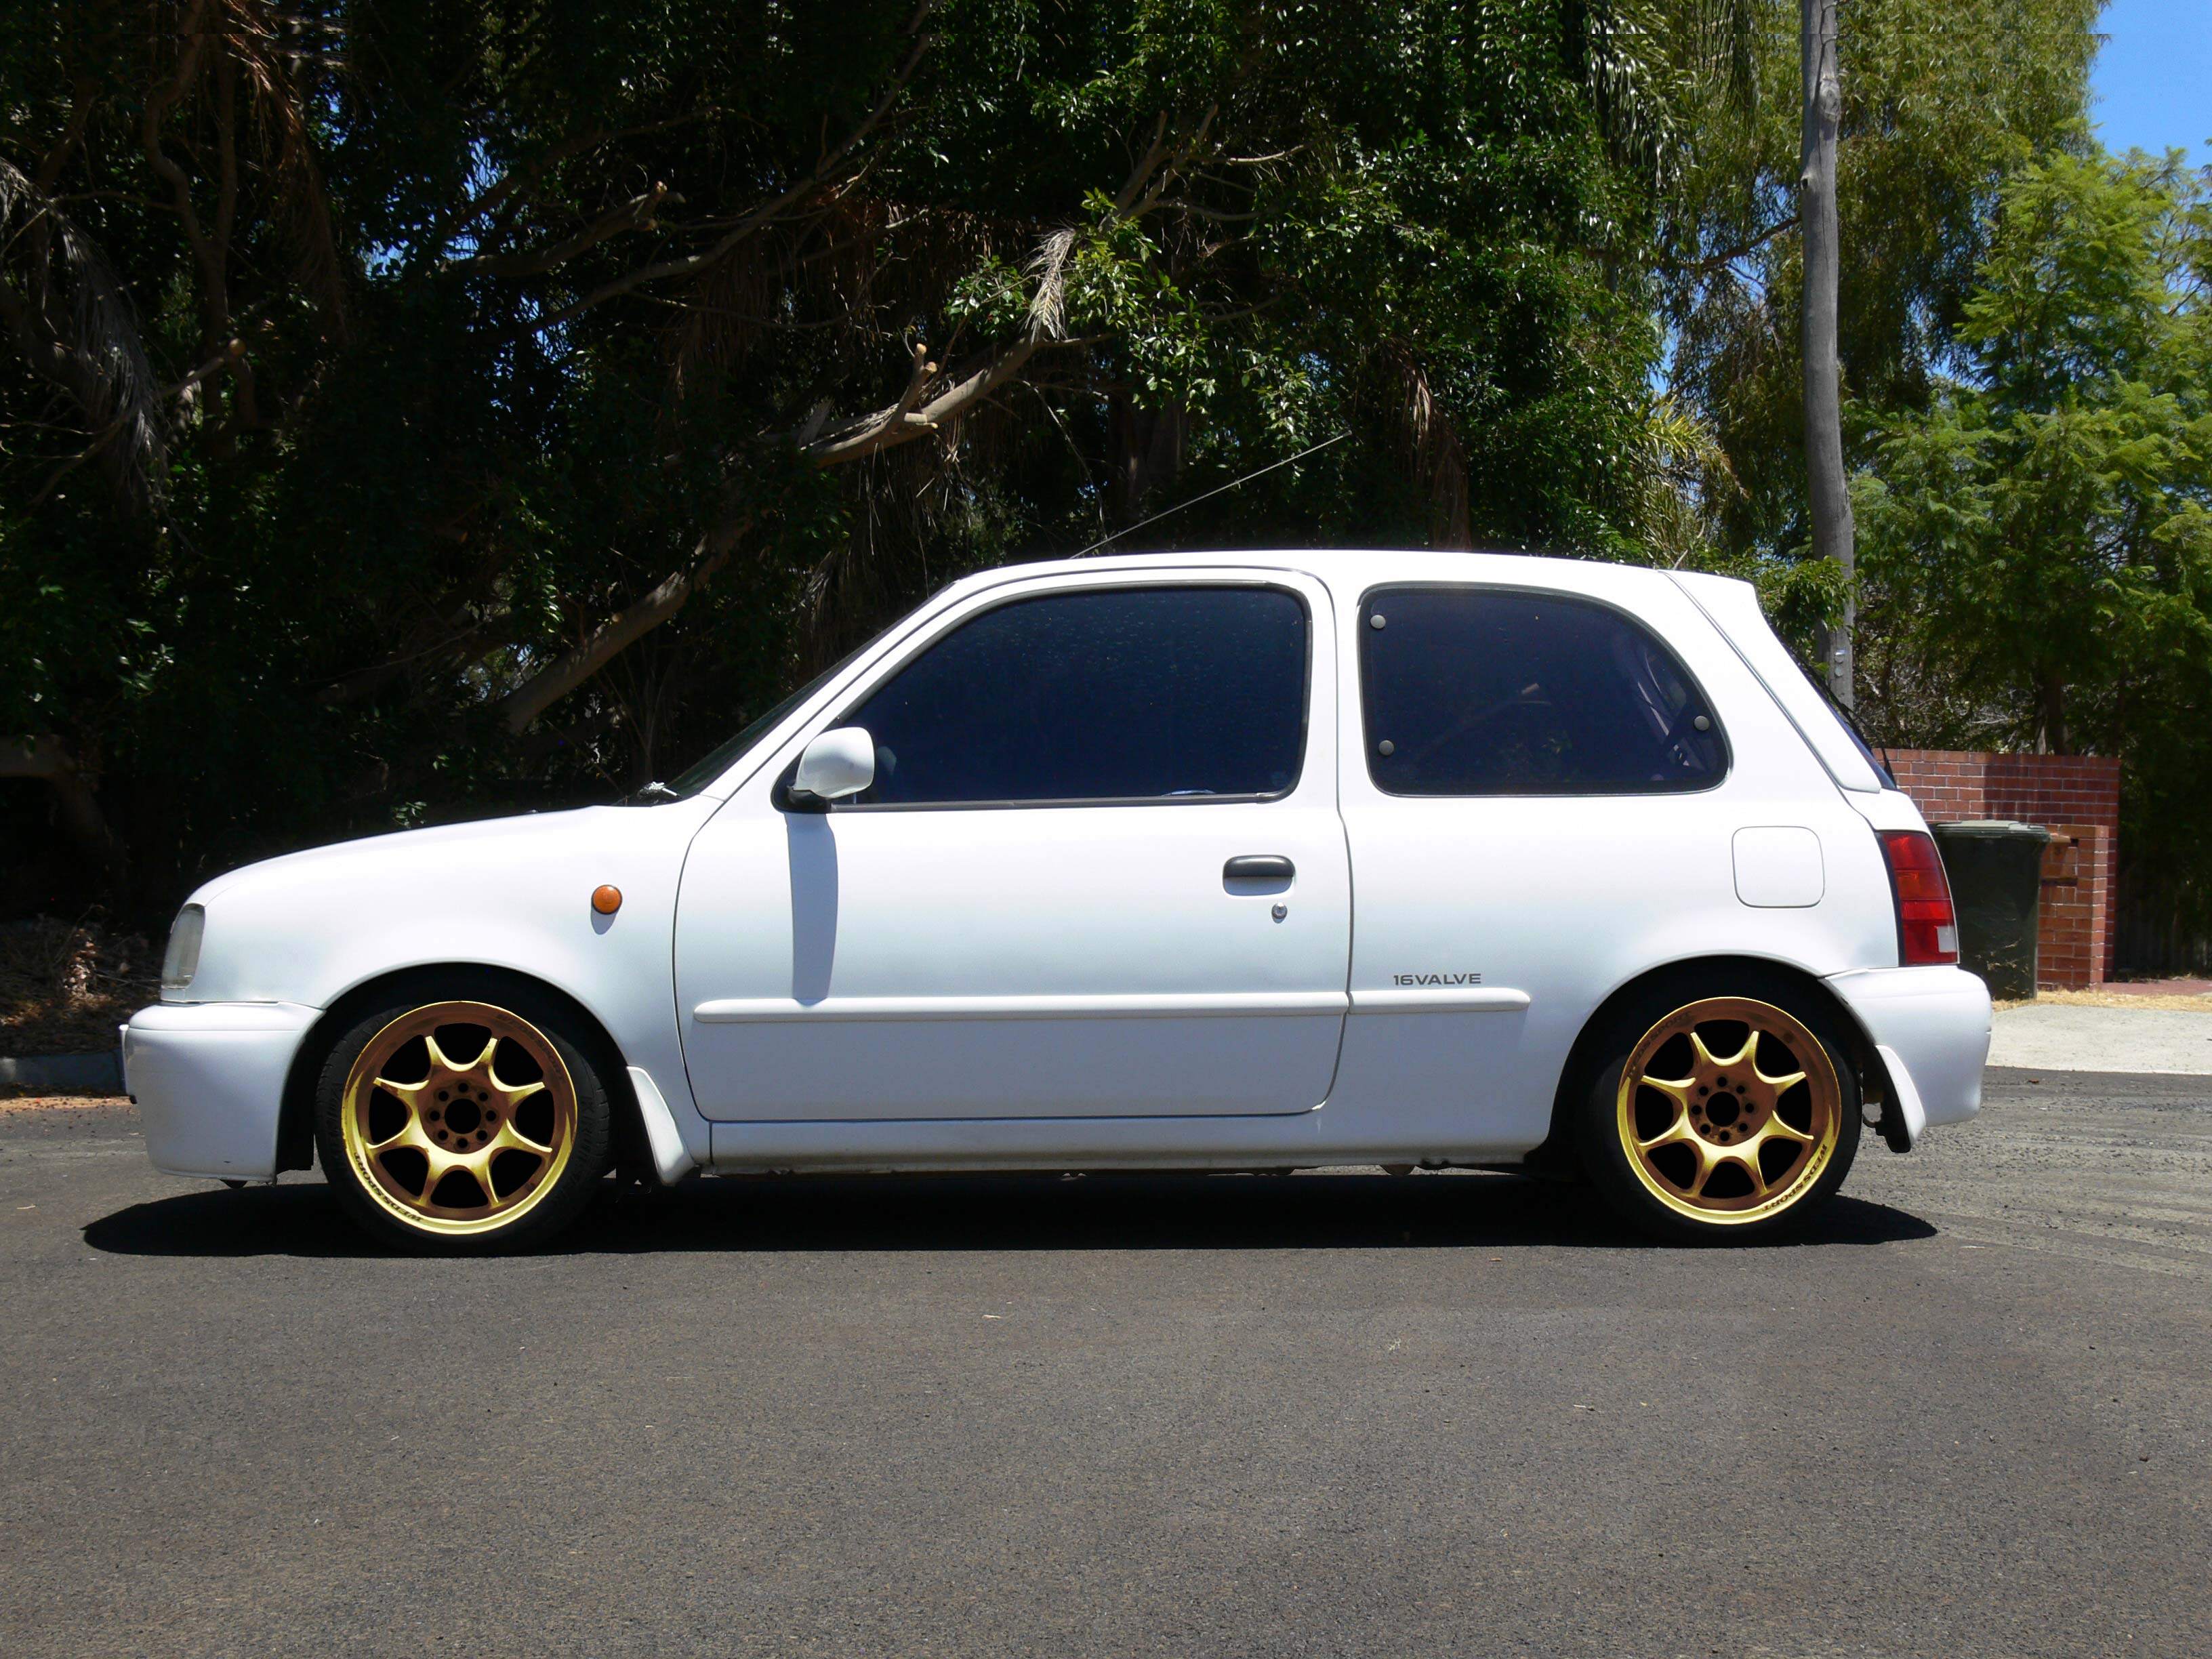
Above: K11 Micra with Gun Metal Grey (photoshop trial colour) 15x6+30 Weds Sport TC-05 (Photoshopped)
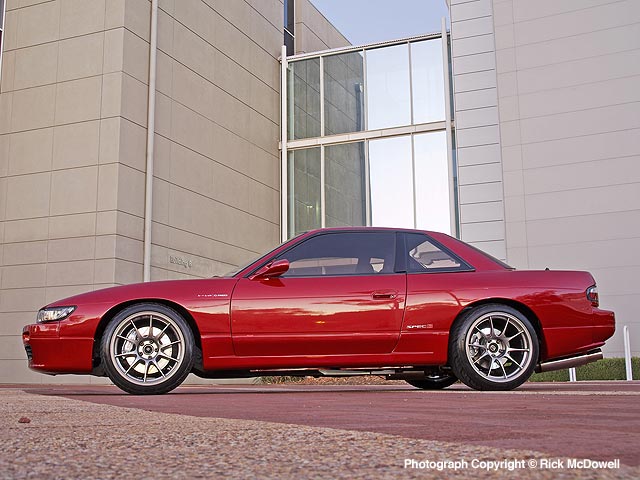
Above: K11 Micra with Gold (photoshop trial colour) 15x6+30 Weds Sport TC-05 (Photoshopped)
Above: K11 Micra with Red (photoshop trial colour) 15x6+30 Weds Sport TC-05 (Photoshopped)
Above: K11 Micra with Black (photoshop trial colour) 15x6+30 Weds Sport TC-05 (Photoshopped)
Still need to work on getting the original Weds Sport decal artwork drawn up so I can replace them once the wheels have been powdercoated.
Thanks to Marc at C-Red, where the car was built over almost a 4 year period, for highlighting to me that SILLBEER has made it into the pick list of the SPEEDHUNTERS 'Reader Car of the Year' Awards 2011.
Be sure to check out the line up, there's some stunning cars there.
Got an email this morning from an old mate of mine who's also the original owner of the sillbeer.com domain name. Ryan was kind enough to let me use his domain when he moved away from the scene for a short hiatus and subsequently let me have the domain name.
Well he's back into the scene again now with a new 240SX (S13 chassis) that he's going to be detailing his new build into a weekend drift machine primarily used to shred rubber making sure to follow his own mantra of "Shredding tires is way more fun than *real* racing". On the blog Ryan has some great info on preparing and parts choice for the S13 chassis.
What a pleasant surprise this morning when I went to take my 5yo son and myself for a haircut. Had to wait a little, so popped over to the newsagent, and found a new magazine called Japanese Retro Auto on the stands brought to us by Performance Imports (a.k.a. Express Publications). This is something that Australia has been needing for sometime, a well designed magazine with classic cars other than the usual Holden/Ford/Chrysler mix. And although there's some Japanese classics in magazines such as Hot 4's, Fast Fours, Zoom et al, they're all so overdone most of the time, they're not really in the traditional classic JDM style any longer...more like trussed up glossy candy that'll make you sick if you have too much.
Anyway, the Compilation Editor for this one is Ryan Lewis, the editor for Fast Fours, but more stemming from his involvement in the-lowdown.com blog. Together with graphic design Steve Cook, they've produced a beautifully designed and typeset magazine that I hope sets a standard for some of the other Express Publications magazines to take a lead from.
Ryan has written a quick introduction to the new Japanese Retro Auto magazine on the-lowdown, so go check it out for a preview of the quality visuals you'll see in the magazine. Once you're done reading, head on down to your local newsagent and grab one.
Wednesday, 6 April 2011 | Comments (4) | Categories:
Apologies for having the site turned off, but I had a flurry of spam comments being posted to the site constantly for a few days so shut it down while they moved on.
In other news, took the car to another MC Motorsport fun day, but unfortunately this one didn't turn out so well for my gearbox. About 2/3 the way through our session, accelerating hard in 2nd gear at about 6000rpm something went boom, clanker clanker in the gearbox and the event was over for me. It has broken, I can only assume, is the input shaft at this stage as I have drive in all gears (sort of), but it's intermittent and very noisy.
Now it's just a matter of waiting for space in the workshop to open up. Keep you posted on the outcome and will be sure to post photos of broken bits of metal.
Cheers
Brendan
PS> I also recently posted up a back dated post on last years World Time Attack Challenge (2010), check it out, of course I'm yet to post up Day 2.
Monday, 13 December 2010 | Comments (10) | Categories: Engine
Recently I had a question sent through from 'obnxsh' on JDM Style Tuning regarding my fusebox.
I was wondering how you have the fuse box mounted where it is? Mine is currently there as well, but it is not done very well. Did you make up your own brackets?
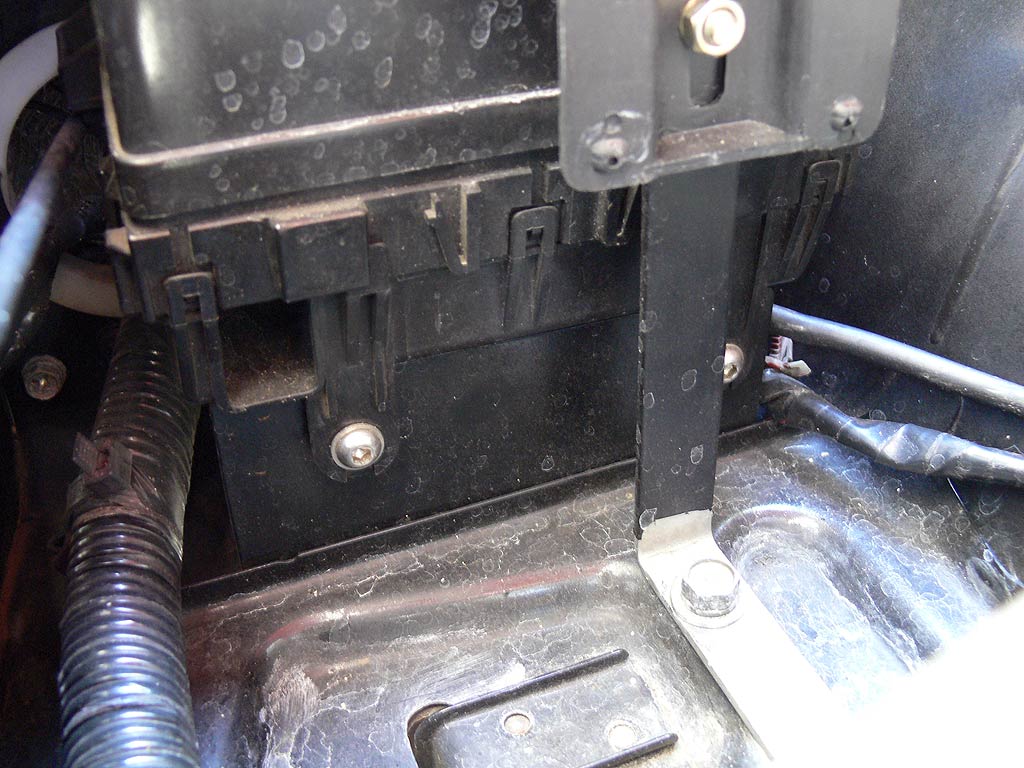
Well, the unfortunate thing is that I wasn't there when this item was installed, so here's some pics of the item as it's mounted on the front right side of the engine bay. Excuse the water drops, they're from driving in the rain without inner guard liners.
So here you can see it's tucked right in to the corner behind where the battery would have originally been located. You can see the simple bracket I made up for the washer bottle in front of it. In behind is an access hole to the inside of the front guard where the loom is fed through and over the top of the front chassis section out of the way of the tyre.
Here's a closeup of the fusebox mounts. The box is held in place by two stainless allen screws attached to a metal bracket that is an 'L' plate bolted down to the horizontal next to the battery tray.
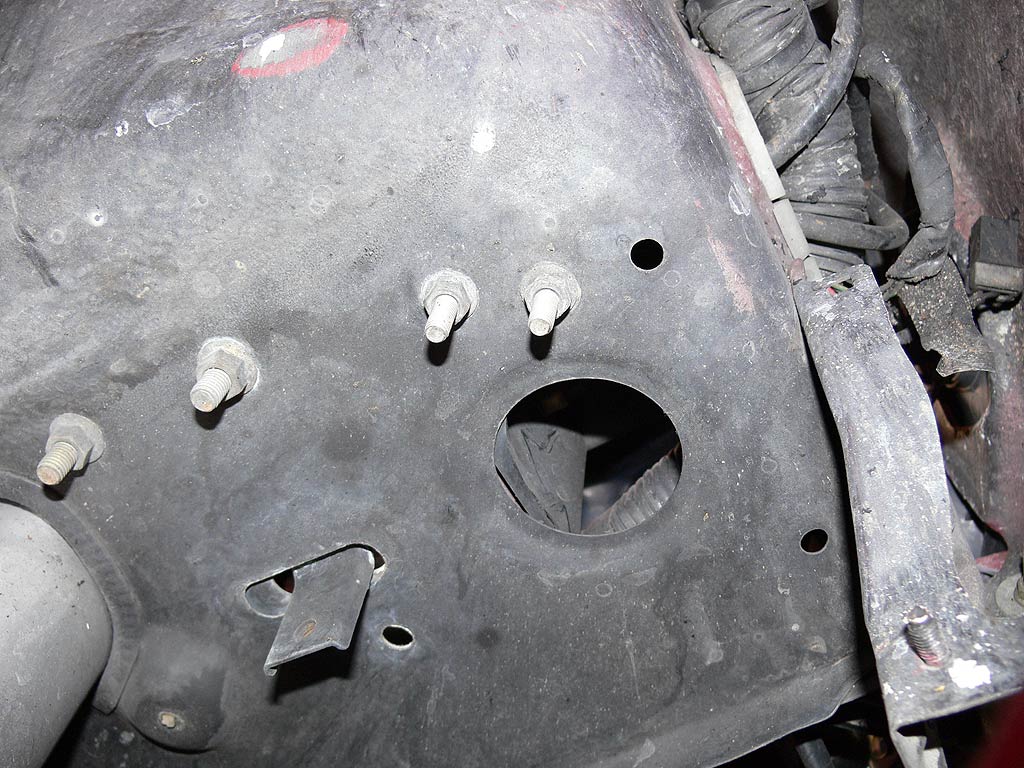
From underneath you can see the two bolts (centred in the photo) holding the bracket in place and also see the vertical section of the 'L' bracket through the hole. I believe this hole would originally have been used by the filler neck running down to the washer bottle which would have taken up residence underneath in this location. The loom can be seen going through the guard in the top right of the photograph.
I hope that helps those looking to mount their fusebox snug in the engine bay and providing room for an aftermarket washer bottle and mounting the battery in the boot.
Ever since I started getting interested in imports, the Yahoo Japan Auctions (for Nissans of course) was a place to go to get inspiration on the latest trends out of Japan. There's also quite a lot of bunkies that you come across but every now and then you come across a gem. This type of post will be a regular in the future I think highlighting what I think are standout cars for sale.
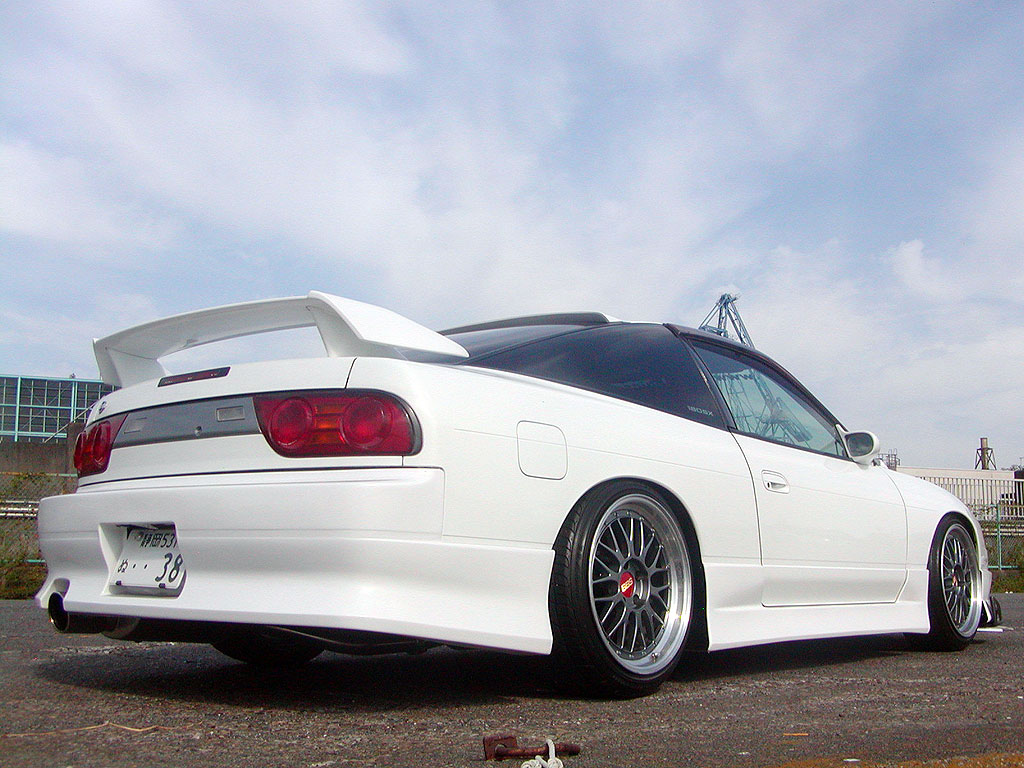
In this case it's an absolute mint 1997 Nissan 180SX Type-X. The Type-X as many will know came with the updated rear taillights, rear spoiler and simple well designed front bumper/spoiler. This one here resplendant in white sits on some classic BBS LM 18x8.5 and 18x9.5 wheels with gun metal centres and red centre caps (the centre caps being an important component).
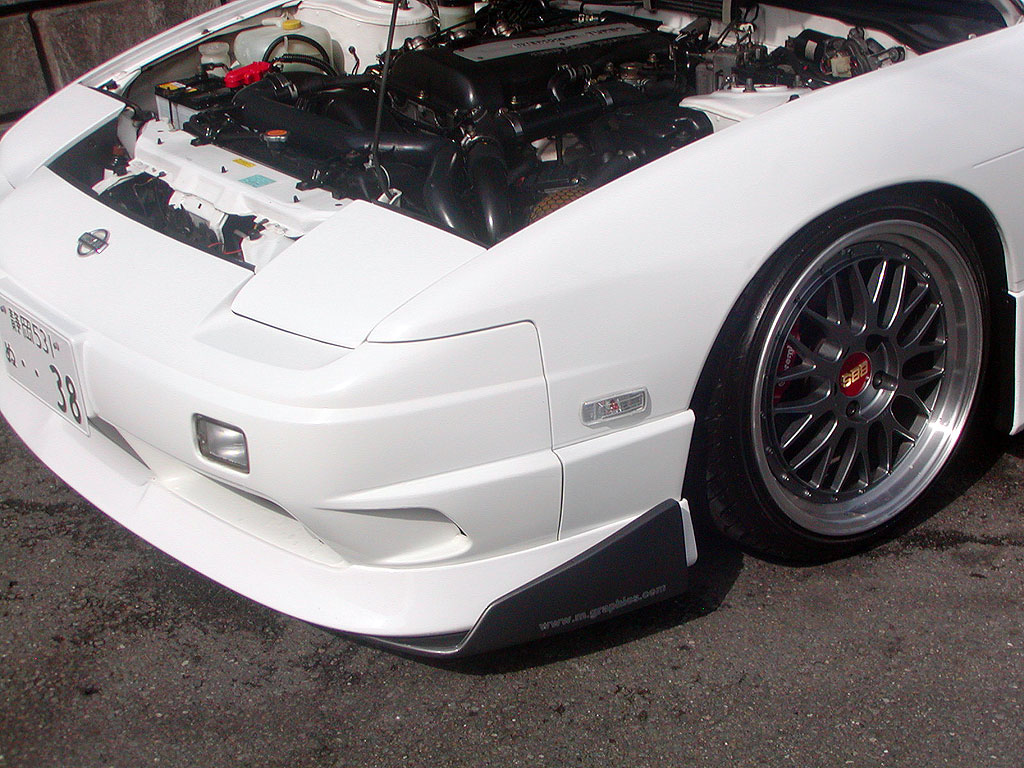
At the front you can see the classic lines of the factory Type-X front bar/spoiler. This one also has some subtle canards attached to the ends of the front spoiler, giving it that modern time attack feel. You can also see the small spoiler that runs along the rear of the bonnet/hood, and the aero mirrors that finish off the front end look.
Here we see those classic late model 180SX Type-X taillights. It's great to see in this day of clear taillight lenses that the owner has stayed with the original, the shape and light setup still looking up-to-date some 13 years down the road. I believe the rear bar is a Vertex item along with Vertex side skirts to match and the front canards that have been fitted to the standard Type-X front bar lower the front/side profile just enough to keep the lower edge line all in sync. There's not a huge amount of dish on the BBS LM's as most offset and disc options would be setup for large caliper brake setups. Also of note is the roof spoiler, possibly from Origin or other quality Japanese aftermarket body kit manufacturer.
Another look from a different angle at the front, a quick search through Google failed to turn up the maker of the front/side canards. A number of companies make them, so if you're looking for some, just Google '180SX front canard', and you're bound to find some. Through the timeless classic that is the BBS LM wheels, you can see some red brake calipers poking out which have a Brembo badge on them. On closer inspection of the Yahoo Photos page, they turned out to be Z32/R32 brake calipers painted red with Brembo logos applied.
Finally we see the engine bay, and although stock, is extremely clean given its 13 years of age. But then I suppose when you take into consideration the original owner was a Nissan Dealer, it's probably not so surprising.
Hope you enjoyed this look into one of things I enjoy doing on a regular basis, I think I'll bring up some other Yahoo Auction or notable car spotlights from time-to-time as I'm sure some of these gems should be highlighted more.
Driving back home on the Freeway after a day at the Great Escape in Hilarys (think water slides and rides etc), I hit something hard and heavy about the size of a small novel. I just didn't have time to miss it and my front left tyre collected it on the inside, followed by a heck of a thump on the underside of the car. I thought to myself that can't be good, and low and behold a few 100 metres up the freeway the steering started to get heavy on the inside. CRAP! So I limped off the freeway and onto a side street. The tyre was going flat fast. I managed to limp it to a garage where I got about 10psi into it and limped it the further 2kms back home. The above shot is the after math.
I got under there and found that the block of whatever debris it was had hit right on the inside edge of the tyre and split the sidewall, which is understandable given the size of whatever it was and travelling at 100kph at the time. This was a pain as the tyres still had a good 30-40% tread left and I knew finding someone with a used one of the same size was going to be difficult. Buying a single new one was out of the question too as it would really upset the handling as the tyre had been upgraded to a new model since I first got them not to mention having tread differences. So I bit the bullet and bought two new tyres in the same size. The originals were Federal 595RS, the new ones are Federal 595RS-R, which is basically the semi-street/circuit tyre and a good tyre given the cost and flexibility of use. Sizing was the same at 235/40R18 and Shane at Bridgestone Tyre Centre in Bentley had them fitted onto the rims the same day I dropped them off.
Now that they're on, they feel much smoother and quieter than the originals, whether this is due to being new and a different compound, or because they don't have a few small flat spots on them I don't know. Either way I happy to have some new rubber up front with an impending session on the skid pan running motorkhana early in December. I now have 1 spare front tyre which I will keep just in case.
Monday, 1 November 2010 | Comments (4) | Categories: General
Well it's about time. I put aside some 'me' time to get my blog sorted. You see back in March, Blogger decided to turn off the feature I was using to publish my blog to my domain - www.sillbeer.com, which sort of put a halt on any updating. So for the last day I've been exporting, converting, designing, templating, styling and generally cleaning it up to a point that I could relaunch.
It's sort of a sorry state that as a website designer and developer, my own personal blog was in such a crappy out-of-date state. I'm happy to say now that the site is in a much better way, converting it over to my website development tool of choice - ExpressionEngine.
Left to do is some tidying up and additions to the side bar including some of my own favourite blogs and websites, plus all the address redirects from the old web pages to the new pages so that Google can find all the new stuff rather than the old pages which it currently has indexed, and that all those links coming in from forums in various guises also get redirected to the new site pages. It's not a job I'm looking forward too, with over 200 posts and other various archive links.
Got some stuff to post about the current state of the car, yes it's still my street driven daily (although I do work from home now), and also about having participated in the recent Powercruise #26 at Barbagallo Raceway.
Now it's time to keep on going before I lose steam on this.